Ticket #4

Day 1

Mr. Smith reached to regarding his printer. I went over to assess the issue and discovered that Mr. Smith was having the same problem as Ms. Locke, where by his printer was no longer being recognized by his computer. I followed the same steps I used with Ms. Locke’s issue and was able to delete all prior drivers and install the latest one too.

When I ran the scan in HP Print and Scan Doctor and the printer was discoverable and showed that it was connected via USB but was “not installed”.

Day 2

When I came back, I started where I left off in the HP Print and Scan Doctor. I selected the printer on the screen and it stated that I needed to install software in order for it to be able to receive print jobs from the computer. The program provided me with a link to the HP website, where I can install the software. The link didn’t work so I did more research about how to fix the software problem. I later restarted his computer, which also didn’t solve the problem.

Day 3

After doing some more thinking, I returned to Mr. Smith with the idea of installing all the updates that were ever released for his printer onto his computer. I used the same Microsoft Catalog I had previously used to help Ms. Locke.

Having installed all the driver updates, I opened up the HP Print and Scan Doctor again and scanned for available printers. This time the printer showed up as “installed” and connected via “USB”. I selected the printer, clicked the option to “fix printing”, the results came back all good and the program provided me with the option to run a test print. I ran the test print and the printer printed successfully.

Ticket #3

Today March 4th 2024, Ms. Egan reached out with a problem regarding her computer. Her computer is not connected to the main Wi-Fi network “apsmobile” and she is having connectivity issues with “apsguest” she is connected to. I wasn’t able to see her today but hopefully I will tomorrow.

Today March 5th 2024, I met up with Ms. Egan and examined her problem. I tried connecting the computer to the “apsmobile” Wi-Fi network but it requested for a “SSID”. I didn’t know what the “SSID” was so I consulted Ms. Carney about it since Mr. McGowan wasn’t available. Ms. Carney shared with me a list of instructions to connect to the Wi-Fi. From the instructions, Ms. Carney and I came to the conclusion that I should try typing in “apsmobile” as the SSID for the network. I did just that and her computer connected to the network.

Ticket #2

Despite having come to a resolution with Ms. Locke about her printer jamming, she contacted me through the database regarding another problem with her printer. This time, her printer was not being recognized by her computer anymore. The printer uses a USB connection to connect to the computer. I assessed the issue by examining the wire and tried swapping it for another but that didn’t resolve it. I proceeded to run a troubleshooter program on the computer and it couldn’t find any problems since it couldn’t recognize the printer.

I went ahead and did some research about it and found information stating that the printer drivers on the computer might be out-dated and need to be updated. I looked for the driver on the HP website and they didn’t have any for the HP Laserjet 1022 printer specifically. Later, Mr. McGowan shared with me a document with instructions on how to uninstall and reinstall printer drivers. I followed the instructions and successfully uninstalled all prior printer drivers on the computer however, I still couldn’t reinstall them from the HP website. I kept searching online and eventually landed on a Microsoft catalog with all the driver updates that were ever released for the printer. I installed the latest one from 2012.

The HP website had recommended I install the HP Print and Scan Doctor and I did. I plugged the printer into the computer again and ran a scan through the program. It listed all the available printers including the Laserjet 1022. It showed that the 1022 was connected to the computer via a USB and it was “Installed”. I clicked on it and it gave me an option to “Fix printing problems” and I clicked on it. It then loaded for about 30 seconds and gave me the option to “Print a test page” which I clicked and the printer printed the page.

Ticket #1

On Tuesday February 6th, Ms. Locke reported that her printer was jamming. Unfortunately, I wasn’t able to reach out to her during the week but I was able to today. When I met with her, she explained that she contacted NBM and they had someone come and look at the printer on Friday February 9th. Today, Monday February 12th, when I checked the printer, it was working but she mentioned that it still gets jammed. I asked her to run a test print with multiple papers and it did get jammed in the process. On examining the jam, I discovered that the feed had sent in 2 papers at the same time hence the jam. I proceeded to remove the cartridge and then gently pulled out the jammed paper. I later carried out my own research online about the issue and discovered that the cause might be a faulty selenoid feed. I discussed my findings with Mr. McGowan and he agreed but also mentioned that this is not a fix we can do at the school due to the printer being under the contract with NBM. I presented Ms. Locke with my findings and recommended that she contacts NBM again and requests that they replace the part or she could use the copier machine for printing larger amounts of documents.

Selenoid

STAT Independent Project

For my 3 topics to research, I chose JavaScript, Arduino and building computers. I found JavaScript interesting because it is an element I can use to enhance and better my HTML and CSS code. Arduinos caught my attention due to their versatility and being something I can work with both through code and hands on. Computers have always fascinated me by how fast they process information and provide an output. I think that building a computer from scratch will magnify my understanding of computers, how they work, and eventually better my user experience.

JavaScript

I started my JavaScript course on Sololearn, a convenient website and app that provides lessons on various computer languages, which was recommended by a friend. I learned about different components of the JavaScript language such as output, variables, comments and datatypes. I got an overview on how to use JavaScript with HTML and CSS to create dynamic animations an how it can be used to create games, mobile apps, interactive menus, and web development.

Arduino

On the Arduino side, I was able to gain an understanding of the basic programming and explore the hardware. Learning to write code for the Arduino was a challenge since it requires code in its own language. I had a watch a significant amount of YouTube videos from creators like Michael Reeves to see the various ways Arduinos can be used in our daily lives. Eventually, I learned how to create some basic code and sent it to the Arduino. I found the Arduino very interesting and I look forward to doing more with it.

Arduino UNO Board

Computer Build

During my research, I learned about the different parts that make up a computer such as: Central Processing Unit (CPU), graphics card (GPU), motherboard, storage drive, memory (RAM), power supply, cooling fan and a shell or case. I watched multiple tutorials on YouTube on how to assemble the PC and how to connect the hardware to function correctly. In addition, I learned about different ways of troubleshooting common computer problems.

Tiny liquid cooled PC Build
A fully built PC

PROGRESS IN THE NEW YEAR

https://time.com/5593706/hard-work-achievement-mindset/

One project. At the end of the last term, I believed I had gotten a good understanding of Python. After starting this term, I wanted to go onto a harder, long-term project. It has been an emotional rollercoaster, times of happiness when things make sense, and time when I question reality and life itself. I’ve worked tirelessly to make this project the best that it can and will be and the passion I put into it will hopefully reflect into its quality.

The project is to create a program that will compare the stats of any two NFL players, and determine which player is a better choice to start on your fantasy team. This project is equally challenging as it is interesting and it allows me to learn a real life application of python.

I begun with lots of enthusiasm, but soon I noticed my interest start to fade. This feeling of boredom began because I wasn’t making any progress and I was getting tired of working. We were nearing Christmas break and I was already on vacation mode, when reality hit me. I have to finish this project, make the presentation and stay on task if I want to keep a good grade. So I put aside my want to relax and grind.

I walked into class with similar determination that I started the term with, and got straight to work. I did my research, found data to scrape for my project and got to work. Before I knew it I was hooked again, I found myself in a good spot before leaving for break and I look to finish my project in the coming week and half.

It is safe to say that I regained my interest in the assignment and I look forward to finishing and using my completed program.

Troubleshooting a faulty adaptor: Ms. Mazzini

On, November 12th, I received an email that there was ticket placed with medium priority. However, upon reading the description of the issue, I knew that this needed to be fixed fast and that I have the ability to do it.

When I came to school the next day, the STAT team and I went to Ms. Mazzini’s room to identify and solve the issue. When we walked in, she informed us of the issue, her screen wasn’t displaying from her laptop. Our first thought was that the connection was loose into the TV, but after checking that plug, nothing seemed to change. My next thought was that there could be an issue with the HDMI to Display Port adaptor. So I removed the adaptor from her laptop, and noticed that the plug was loose and it moves when touched. I figured that adaptor must be dead and damaged, so I went back to the classroom to test it out. Sure enough, it didn’t work when I tested it on a MacBook.

After identifying the issue, we had to solve her problem. It was a simple solution, just find a new and working adaptor. After searching for 5-6 minutes, we found a brand new HDMI to Display Port adaptor. Returned to her room and plugged it into her laptop, and just like that the TV was displaying what the laptop was showing.

Face Recognition Update

Since my last update, I’ve been able to get all three face recognition programs to work as intended. I have even been able to increase the number of photos taken from 30 to 60 to increase the confidence levels and accuracy of the face recognition. I have now moved on to working on getting two of my favorite games to run on the Raspberry Pi. The first game I installed was Wolfenstein3D for MS-DOS. This was relatively simple. The emulator I ended up using was DOSBox Emulator. The second game I wanted to play on the Pi was Tetris for the Game Boy. For this, I decided to use an emulator called RetroPie.

Update 11/27

I have attempted to replace my Raspberry Pi 3 with a Raspberry Pi 4, however there have been some issues. During my attempt to transfer the SD card from my Raspberry Pi 3 to a Pi 4, an error occurred, resulting in the corruption of the data stored on it. However, this mishap unexpectedly turned into a stroke of luck as it presented an opportunity for a fresh installation of a newer version of Raspbian on the Pi 3. This updated version conveniently included a pre-installed Visual Studio Code, which greatly aided my progress.

My next step is to resolve the low voltage warning that has started appearing and crashing the Pi. I have a few ideas on how to do this, but I plan on researching further before committing to one.

Dev. Log #2: Unity Create with Code – Unit One

In this developer log, I will be sharing the beginning of my experience with the Unity Create with Code course. This course takes you on a step-by-step journey into the world of Unity game development and C# scripting.

Player Control

The first unit of the course, called “Player Control,” had me create a driving game to learn how to apply physics, script a car to move using keyboard inputs, and apply these physics to allow the user to collide and knock over boxes.

The first lesson started by providing a folder of assets to create an environment, including the vehicle, boxes to collide with, a skybox, and the road to drive on. After setting up the environment, I began creating and applying my first script: a player controller.

The second lesson was the most important; it taught me how to move the car down the road at a constant speed and incorporate collisions with obstacles. Some key concepts and skills I learned included:

  • Applying C# scripts to objects
  • Using comments in my code
  • Utilizing a Vector3
  • Understanding the difference between Start and Update in scripts
  • Applying Time.deltaTime
  • Adding components such as Colliders and RigidBodies

The third lesson introduced the use of public variables to change elements of the game in real-time, creating smoother gameplay. This lesson replaced the previous static value of the “speed” in the code with a public float variable called “speed,” allowing me to adjust the variable while the game was running to optimize the speed to my liking.

Additionally, this lesson guided me in creating another script to have the camera follow the player and offset from the car’s position. I learned new concepts and skills such as declaring and initializing variables, understanding data types, and using access modifiers.

The fourth and final lesson taught me how to take full control of our car and drive it around the scene. The course shifted from moving the car forward at a constant speed to using the Input Manager system to update the car’s Vector3 with user inputs.

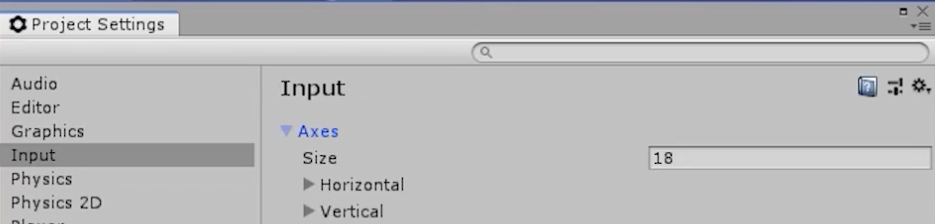
This involved allowing the user to control the car left/right while constantly accelerating. The lesson started by using horizontal movements to slide the vehicle left and right. Then later improving the code to rotate the vehicle left/right, providing semi-realistic movements.

The unit concluded by allowing the user to change the forward/backward speed of the vehicle using vertical inputs and cleaning up my hierarchy and code. The last lesson introduced the concept of grouping multiple objects into empty objects for organization.

After completing these four lessons, the final part of this unit is a challenge. Unity provided another asset pack, but this time, the goal is to program a plane simulator with obstacles. The challenge outcome included:

  • The plane moves forward at a constant rate.
  • The up/down arrows tilt the nose of the plane up and down.
  • The camera follows along beside the plane as it flies.

To achieve this, I had to troubleshoot the code and resolve some bugs. Here’s a list of the issues I resolved to make the game function properly:

  • Making the plane go forward
  • Slowing the plane down to a manageable speed
  • Making the plane tilt only if the user presses the up/down arrows
  • Repositioning the camera so it’s beside the plane
  • Making the camera follow the plane

Troubleshooting some of these issues was complex, but the lesson provided hints that pinpointed the exact issues with the code and suggested how to resolve them. I without a doubt enjoyed this unit; each step included a video and description on how to break down each function of the gameplay to create a solid prototype of the game.

As I reflect on this journey so far, I’ve gained valuable insights into game development and C# scripting. It’s clear that Unity Create with Code is an excellent resource for learning, providing a structured approach and in-depth understanding of how game development works. I’m excited about what lies ahead and can’t wait to apply the skills I’ve acquired. In the next part of my journey, I’ll be diving into the second unit of this course, called “Basic Gameplay.” I’m eager to start this new unit, tackle the challenges that come with it, and create even more exciting projects.

Design a site like this with WordPress.com
Get started